🥗 PaleoYummers Hub: Alle Rezepte und Einsteiger-Guides im Ueberblick — schau in den
Paleo-Hub rein.
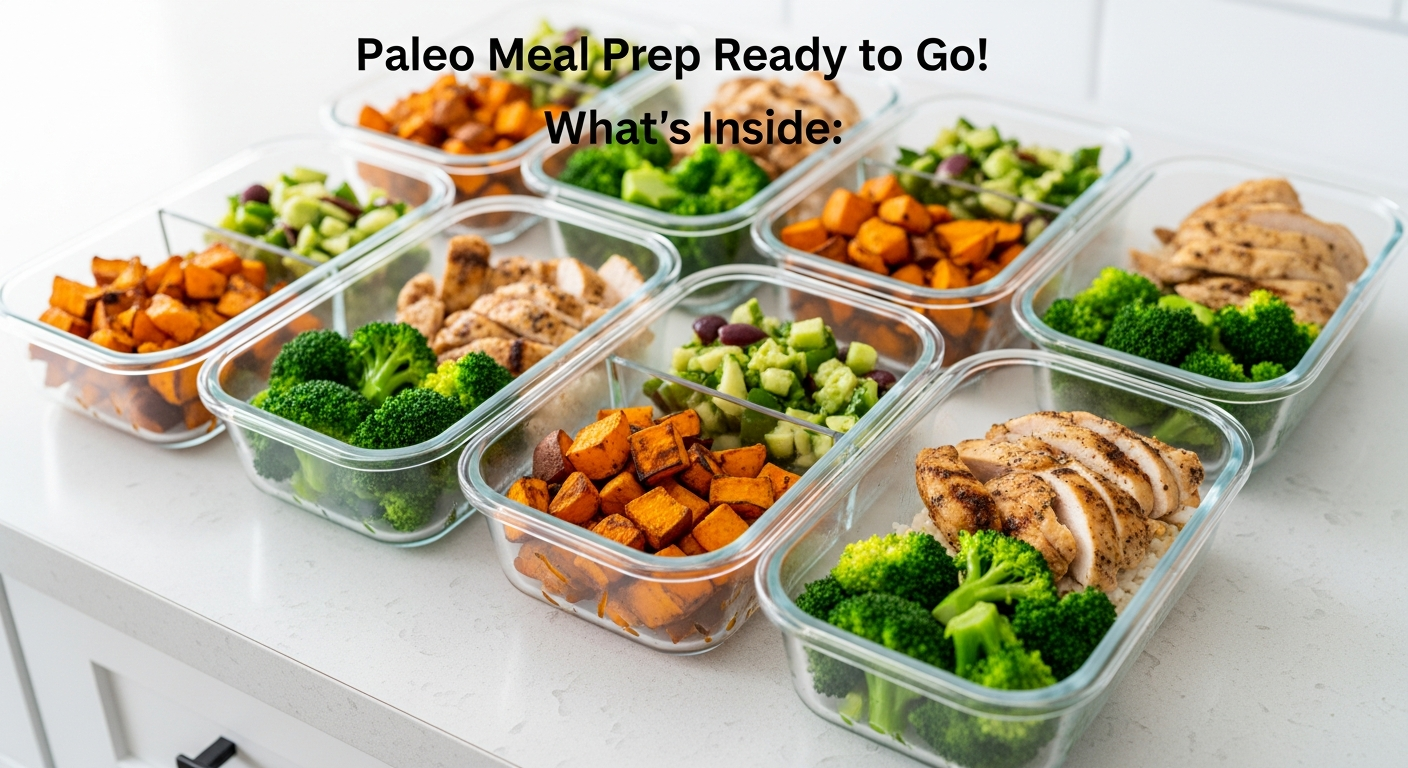
Paleo Meal Prep: Your Complete Weekly Game Plan
Meal prepping on paleo isn’t optional if you actually want to stick with it. I know that sounds aggressive. But after three years of eating this way, the single biggest predictor of whether I fall off the wagon is whether I spent two hours on the weekend getting my food situation sorted. No prep? By Wednesday I’m ordering Thai food and telling myself coconut milk makes it paleo.
So here’s everything I’ve figured out. The mistakes, the systems that stuck, the stuff I wish someone told me before I threw away my fourth batch of soggy reheated broccoli.
Why Saturday Morning Beats Sunday Night (Every Single Time)
Meal prepping Sunday night is a mistake. Saturday morning, people. I used to do the Sunday-evening thing like everyone else recommends, and by 8 PM I’d be exhausted, rushing through chopping, burning my second batch of roasted vegetables, and going to bed stressed. Terrible way to start the week.
Saturday mornings changed everything. You’re rested, there’s no deadline pressure, and if something goes wrong — a chicken needs another 20 minutes, you forgot to buy cilantro — you’ve got time. Farmers markets are open. You can actually enjoy the process instead of treating it like homework that’s due tomorrow.
The whole thing takes me about two hours now. When I started, it was closer to four. That’s normal. Batch cooking consistently saves 4-5 hours per week compared to cooking every single meal from scratch, so even at the slow beginner pace, you’re coming out ahead.
The Only Strategy That Actually Works Long-Term
Cook 1-2 proteins for the week and mix-and-match everything else around them. I cannot overstate how much this simplification matters. Early on I tried to prep five completely different meals with five different proteins and five different sides and by Thursday I wanted to scream at the sight of a glass container.
Now? I’ll roast a whole chicken and sear a big batch of ground beef. That’s it. Two proteins, done. Last week I batch-cooked a whole chicken and got 4 different meals out of it — shredded on salads Monday, in lettuce wraps Tuesday, tossed with sweet potato hash Wednesday, and thrown into a quick soup Thursday with whatever vegetables were getting sad in the fridge.
The ground beef became taco bowls (no shell, obviously), got stirred into a hearty beef stew situation, and finished up as stuffed bell peppers. Same two proteins. Six meals. Zero boredom.
What Should I Actually Cook During Prep?
Proteins first, starchy sides second, everything else day-of. Here’s my typical Saturday session broken down:
Start your oven at 400F. Get a whole chicken or a big tray of thighs in there immediately. While that’s going, brown your ground meat on the stovetop. Season half one way, half another — keeps things interesting without extra effort.
Then sweet potatoes go in the oven alongside the chicken. Sweet potatoes maintain their texture way better than regular russet potatoes when reheated, which is why they’re the undisputed champion of paleo meal prep. Russets turn into this weird grainy mush by day three. Sweet potatoes on day four? Still great. Cube them, roast them, done.
While the oven does its thing, I hard-boil a dozen eggs. Boring? Sure. But grabbing two eggs with some avocado and leftover protein is the fastest paleo breakfast that exists. If you want something more exciting in the morning, check out these quick paleo breakfast ideas that take under 10 minutes.
Fresh vegetables I mostly leave raw until the day I eat them. Roasted broccoli on Saturday doesn’t taste like roasted broccoli on Wednesday. It tastes like disappointment. The exception: any vegetable you plan to put into a sauce or broth. Those actually get better with time. Which brings me to…
The Freezer Is Your Secret Weapon (Use It Wrong and You’ll Hate Meal Prep)
Foods in sauces and broths freeze exceptionally well — dry foods don’t. This was my biggest revelation about year two. A plain grilled chicken breast in the freezer is rubber when you thaw it. That same chicken breast simmered in a coconut curry sauce? Comes out of the freezer tasting like you made it an hour ago.
Cooked protein keeps 3-5 days in the fridge, which covers your work week. But for those weekends when life happens and you can’t prep, having freezer meals is the safety net. Soups, stews, curries, chili — they’re all good for 3-4 months in the freezer. I always cook double batches of anything saucy and freeze half.
And please — get glass containers. IKEA glass containers are what most of us in the meal prep world swear by. They’re cheap, they stack well, the lids actually seal, and you’re not microwaving plastic. Which, paleo or not, is just a good life choice.
How Do You Keep It From Getting Boring?
Sauces and spice blends are the entire answer. Same chicken, completely different meals. Monday it’s got chimichurri. Tuesday, a tahini drizzle. Wednesday, buffalo sauce (most are paleo-friendly, check the label). Thursday, pesto.
I keep about six sauce options in the fridge at all times. Takes maybe 15 minutes total to blend them up during prep. The protein and vegetables are the boring reliable backbone. Sauces are where personality happens.
Also: texture matters more than people think. Throw some toasted nuts on there. A handful of crispy plantain chips. Pickled onions take five minutes to make and transform leftover meat from „sad desk lunch“ to „thing I’m actually looking forward to eating.“
What About Macros? Do I Need to Track Them?
Most people eating paleo land around 35% fat, 35% carbs, and 30% protein without trying. If you’re eating real food — meat, vegetables, fruit, nuts, sweet potatoes — the ratios tend to sort themselves out. I tracked obsessively for about four months when I started and then realized my numbers barely moved week to week. The structure of paleo does the work for you.
The one thing I’d watch: make sure you’re eating enough carbs from starchy vegetables. Too many people go paleo and accidentally go low-carb because they’re avoiding grains and not replacing those carbs with sweet potatoes, plantains, beets, or fruit. By Thursday they’re exhausted and blaming the diet when really they’ve just been under-eating carbohydrates.
My Actual Weekly Game Plan (Steal This)
Here’s exactly what a typical week looks like in my kitchen.
Saturday morning: Roast chicken + season and cook ground beef + roast cubed sweet potatoes + hard-boil eggs + make 2-3 sauces + wash and chop raw vegetables (but don’t cook them yet).
That gives me a fridge full of building blocks. Lunches are usually a protein + roasted sweet potatoes + raw or quickly sauteed vegetables + sauce. Dinners I cook fresh vegetables and pair with whatever prepped protein makes sense. Breakfasts rotate between eggs with avocado, leftover protein hash, or something from my quick breakfast rotation.
The key mindset shift: you’re not prepping meals. You’re prepping ingredients. Meals assemble themselves at eating time. Takes three minutes.
Frequently Asked Questions
How long does paleo meal prep take?
About 2 hours once you’ve got a routine down. Beginners should expect closer to 3-4 hours for the first few weeks. It gets faster quickly because you stop second-guessing recipes and just cook on autopilot.
Can I meal prep paleo lunches for the whole work week?
Yes, cooked proteins stay good in the fridge for 3-5 days. Pair with fresh vegetables mid-week if you notice the prepped ones losing their appeal. Sweet potatoes hold up all five days without any texture issues.
What containers should I use for paleo meal prep?
Glass containers, always. IKEA’s glass food containers with snap lids are the best value. They don’t stain from turmeric or tomato sauce, they’re microwave and oven safe, and you avoid heating plastic against your food.
How do I keep meal prepped food from tasting bland by Thursday?
Make multiple sauces and rotate them throughout the week. Same chicken with chimichurri Monday and pesto Thursday tastes like two completely different meals. Pickled onions, toasted seeds, and fresh herbs added at eating time also help enormously.
Is it cheaper to meal prep on paleo?
Significantly, yes. Buying proteins in bulk, using a whole chicken instead of pre-cut parts, and reducing food waste through planned cooking easily saves 30-40% versus buying paleo-friendly meals or ingredients ad hoc throughout the week.
What paleo foods freeze best?
Anything in a sauce or broth freezes beautifully. Stews, curries, chili, and braised meats all hold up for 3-4 months. Dry proteins and plain roasted vegetables don’t freeze well — they lose their texture and taste cardboard-adjacent when thawed.
Should I prep breakfast too?
Prep the components, not the finished meal. Hard-boiled eggs, pre-cooked breakfast sausage, and diced sweet potatoes ready for a quick hash are all you need. Assembling takes under five minutes in the morning, and it tastes fresh instead of reheated.
What if I don’t have two hours on the weekend?
Split it into two one-hour sessions. Cook proteins one evening, roast vegetables and make sauces the next. It’s less efficient than doing everything at once, but it still beats daily cooking by a wide margin. Even a partial prep — just the proteins — saves you at least an hour on weeknights.